Security using Uncomplicated Firewall (UFW)
We are going to set up some firewall rules to illustrate how we can lock up our machines, but yet allow access for access for certain protocols.
Installing UFW
We should really update our machines before we do this, but we did that at the end of last lab. We will update before we leave again today.
Test to see if UFW is installed
To see if UFW is installed or not, try:
sudo ufw status
Install UFW
sudo apt install ufw
Setup some firewall rules
CAREFUL – we do not want to lock ourselves out of our own machines. We are wanting to set up some rules, but we do not want to apply them until we can make sure we are not locked out.
Lock down everything but keep ssh open
There are plenty of web pages to check out to help, but Scott and Matt really like Digital Ocean and Stackexchange – here is a Digital Ocean link:
sudo ufw default deny incoming
Allow everything out from our servers
sudo ufw default allow outgoing
Make sure we can get back into our machines
sudo ufw allow ssh
Turn on the firewall
sudo ufw enable
Check to see where we are at for ports open
sudo ufw status
We should see that port 22 is open for ssh.
We can do more – but we will leave it for today
If we were really wanting to lock down ssh further, we could edit ssh to use a different port and change the firewall to open that port. The trick is to set the port to be open with UFW first –> reload UFW rules, then edit: /etc/ssh/sshd_config to change the default ssh port. You also need to do this through a ssh connection (not x2go) software such as Putty
Setting up to access PostGIS from osmotar
We need to add one more rule to access postgis through the firewall as well as configure postgres to allow access to your database from osmotar.
Get remote machine information
Login to osmotar and get the address of the server you are working from on the osmotar cluster by:
- Open the command prompt (type cmd at the start menu on osmotar)
- Type ipconfig in the command window
- Jot down the address
Set a rule for UFW
Back on your VM add a rule for accessing PostGIS from the server:
sudo ufw allow from xxx.xxx.xxx.xxx to any port 5432
The xxx set represents the address of the osmotar cluster server IP. Restart UFW by issuing the command:
sudo ufw reload
sudo ufw status
Set a rule for allowing access to Postgres
- Use sudo to edit /etc/postgresql/12/main/pg_hba.conf
- Add a line at the end of the IPv4 to allow connections from the same machine
- host all all xxx.xxx.xxx.xxx/32 md5
- Save the file and restart postgres with the following command:
sudo service postgresql restart
Other security considerations
We should be very careful to close off the connection after we have completed our work. There are number of steps we can also take to better protect our data.
- Always use a strong password
- Setup a new user(s) for postgres for specific actions (i.e. read only users)
- Setup a copied database or schema that can be exposed to the outside
- Use different ports or tunnels instead of default ports
Testing with QGIS and FME
We should now be able to access our server through QGIS and FME.
QGIS
- Open QGIS
- Setup a new connection to PostGIS using the address of your VM
FME
- Open FME Data Inspector and setup a connection
- Open dataset
- Choose PostGIS
- Setup the connection by adding a new connection
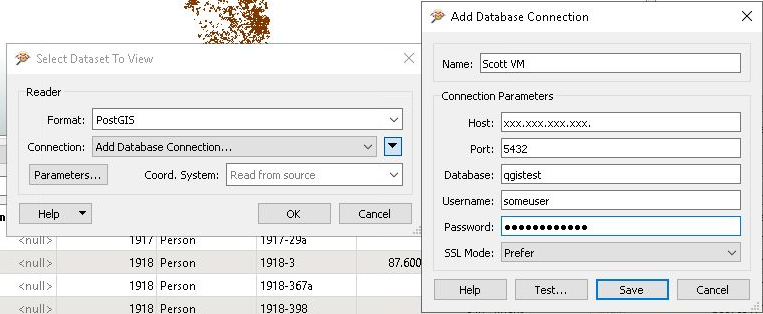
You should be asked what tables to add when you connect – test with one of your layers
FME workbench and PostGIS
You should be able to test accessing your PostGIS database by generating a new workspace.
- Use: L:\GEOG413\fme_postgis_tutorial\pg_city_index.sqlite as input
- Use your connection to your VM’s postgis database
- Name your output table properly
- Include the LabelPointReplacer as a transformer
– Use the fid as the label value
– Use 5 as the label height - Run your translation
Open the results in QGIS on your VM